I am obsessed with a new phone app that I just happened to find. I searched for something like it but did not have a specific one in mind. Well the one app that I ended up getting I LOVE!!! I searched for something to help me keep track of lists, especially grocery lists and to-do lists.
I found the Out of Milk app on my droid and it is AWESOME!!
Not only can I make lists for different stores, I can scan the UPC symbols of products (or enter manually) and it adds them to the lists and I can also enter prices and coupons that I have. It adds everything up and I can have a pretty good idea of what I am going to spend at the check out (it factors in the coupons as well).
I can also keep track of my pantry items and spices so I know when I am getting low. I can also transfer and copy specific items to different lists - for example, the stuff I just bought at the store on my grocery list can be copied over to the pantry list.
The app also has a to-do list as well. I am adding things all day and then I cross them off via the app when I finish. The grocery lists work that way as well.
So why is this a big deal...I never download apps. I have a few, mainly for my daughter, but I am not one to download a bunch of apps but this one is so useful to me. I took especially long at the grocery store the other day because I wanted to scan items and add the prices in so I could use the app to its full potential. Out of Milk saves the items so the next time I buy them, all the pricing and item info (as long as it is the same) is stored.
FYI: I am also able to access all of my lists online as well via my computer so I can add/change things easily that way as well. I did end up paying the $2.99 or $4.99 (not sure how much) fee so this online capability could be because of that but not sure.
I have lists now for all kinds of stores and several to-do lists. NOW, I just need to get an accurate pantry and stockpile list going - that part to me is not fun - but would be helpful to have.

Sunday, March 4, 2012
Tuesday, February 14, 2012
Make your own smoothie shaker
I wanted to "invent" something NEW (sort of) that I could share that would be fun and easy - the idea is not my own original idea but the home version is my own idea (at least I hope so - haven't seen it anywhere). I have seen those expensive Dole Smoothie Shakers in the grocery store and was really wanted to see if I could replicate the concept at home.
I came up with an at home smoothie shaker version that works fairly well - so far so good - and I thought I would show you what I came up with.
First you need to have a few items - I am always looking for uses for the ice cube trays (with lids) that I used to make my daughter's baby food. This is a reason to bring those back out!!
Second - a mason jar or something similar. The container needs to be "hard" so that when you shake, the frozen goodness breaks up and turns into a smoothie. I originally tried a plastic container and it didn't do anything.

And last but not least, a food processor or something that will puree fruit. (I will explain further). I used my baby food maker.
Basically, here is what I did.
I had bananas that were getting really ripe (around three) so I decided I would try this out. I pureed them but you can mash them with a fork or use a hand mixer. Bananas are easy to mash up and are probably the best fruit to use for the at home version. I recommend using ripe bananas or they are not going to taste is good and they will be too hard for this home version.
I also bought some strawberries that were on sale (buy one, get one) so I had a bunch. I pureed them as well (not quite an entire pound).
I froze the mashed bananas, strawberries, and one container of Yo Baby Blueberry yogurt (you could probably use whatever you have on hand) all in the ice cube trays. I kept everything separate but maybe you could combine as one mixture and freeze - I didn't try this - maybe next time.
I know it sounds like a little bit of work up front but makes a good amount that you can make quite a few smoothies without bringing out the blender every time you want to drink one.
Okay, fast-foward 24 hours once the fruit is frozen.
Here is how you make the "smoothie":
Get out your mason jar and add approx. three cubes of bananas, two cubes of strawberries, and two cubes of yogurt (makes about 8 oz of a smoothie). Then I pour about 1/2 cup of apple juice over top (basically enough to cover the cubes) - less is better and then add more if you need to so it isn't too watery. You can use any kind of juice you like - I am considering trying carrot or more of a vegetable infused juice in the future.
Put on the lid and SHAKE, SHAKE, SHAKE!!! It takes some good shaking and I will be honest, we do still have some chunks of fruit (which I usually try to break up a bit w/ a spoon) but all in all, this works pretty well.
I have come to the conclusion that you have to use bananas and yogurt because of their consistency and how they melt easily - not sure if you can try other berries b/c I haven't done that yet. I have wild blueberries so I may try those.
I did puree some spinach b/c I wanted to add some iron to the smoothie but I couldn't get the spinach to break up enough even after shaking vigorously. I think there is too much water content in the spinach (almost like an ice cube) HOWEVER I have it now and don't want it to go to waste, so I am just going to thaw in the fridge and add it in - this step is not necessary but wanted to give a heads up.
These come out really good and are easy and quick to make once you have done the original prep work. Good luck and if anyone tries other vegetables or fruit, let me know how it works. I would like to sneak in more veggies for my daughter and even for myself - I am probably the worst!!!
This is my at home version - I am not a chef or scientist but I don't have too many fears in the kitchen - so if anyone has any suggestions or tips, please let me know!
Saturday, February 11, 2012
Easy...Fiber One Cereal & Granola Bar
I found a recipe on another blog & from Pinterest for 5 ingredient peanut butter granola bar but I adapted it a little to make my own. I wanted to add Fiber One cereal because fiber is good for you but I also have some of the cereal that I need to use up before it expires. (I don't eat Fiber One as cereal, I use it to make Hungry Girl faux-fried chicken, onion rings and even faux-fried fish).
4 cups old fashioned oats
1/2 cup Fiber One Original cereal (crushed - I did this in the food processor - do not completely crush, just chop it up a bit)
1 cup peanut butter (melted in microwave) - I used regular peanut butter but I am sure any nut butter or natural peanut butter could be used - I didn't try this so not sure
3/4 cup honey (I used 1/2 cup honey and approx. 1/4 cup agave nectar) - ran out of honey - I also heated the honey a bit b/c it is much easier to work with. The agave is a little runnier so I didn't heat it.
Cinnamon (a few dashes) - if I were to guess, around 1/4 tsp. - You want a hint of it but don't want it overwhelming - just enough for someone to say, what is that...hmmm
1/4 cup - 1/2 cup of miniature semi-sweet chocolate chips
In a large bowl, combine oats, Fiber One cereal, and half of the chocolate chips (approx 1/4 now and another 1/4 at the end)
Stir in melted peanut butter and honey and/or agave (I am not sure what using all agave would taste like but it would probably work just fine)
Sprinkle in the cinnamon
I added a little more chocolate chips b/c the first bit that I added melted from the warm honey & peanut butter which is why I said add half early and half later. The melted chocolate made it taste awesome but I wanted a little bit of chips to show for appearance and texture.
I had to give it a pretty good stir and even used my hands so that the granola was evenly coated. You want it to be pretty sticky/gooey so that the granola sticks together and forms bars when you cut them. If it is too dry, add more melted peanut butter, honey and/or agave.
Line a 13x9 pan w/ foil and spray w/ cooking spray or use non-stick foil (this is what I used). Pour in the granola and press down. Cover & refrigerate for 1 hour.
Lift the foil from the pan w/ the granola on it. The foil makes the granola easy to just pull out and cut into bars. I saw this trick from Martha Stewart, I believe.
I originally was going to store the bars on my cake plate on my counter but they started to soften up a bit & kind of get a little crumbly so I put them back in the fridge in a plastic container.
4 cups old fashioned oats
1/2 cup Fiber One Original cereal (crushed - I did this in the food processor - do not completely crush, just chop it up a bit)
1 cup peanut butter (melted in microwave) - I used regular peanut butter but I am sure any nut butter or natural peanut butter could be used - I didn't try this so not sure
3/4 cup honey (I used 1/2 cup honey and approx. 1/4 cup agave nectar) - ran out of honey - I also heated the honey a bit b/c it is much easier to work with. The agave is a little runnier so I didn't heat it.
Cinnamon (a few dashes) - if I were to guess, around 1/4 tsp. - You want a hint of it but don't want it overwhelming - just enough for someone to say, what is that...hmmm
1/4 cup - 1/2 cup of miniature semi-sweet chocolate chips
In a large bowl, combine oats, Fiber One cereal, and half of the chocolate chips (approx 1/4 now and another 1/4 at the end)
Stir in melted peanut butter and honey and/or agave (I am not sure what using all agave would taste like but it would probably work just fine)
Sprinkle in the cinnamon
I added a little more chocolate chips b/c the first bit that I added melted from the warm honey & peanut butter which is why I said add half early and half later. The melted chocolate made it taste awesome but I wanted a little bit of chips to show for appearance and texture.
I had to give it a pretty good stir and even used my hands so that the granola was evenly coated. You want it to be pretty sticky/gooey so that the granola sticks together and forms bars when you cut them. If it is too dry, add more melted peanut butter, honey and/or agave.
Line a 13x9 pan w/ foil and spray w/ cooking spray or use non-stick foil (this is what I used). Pour in the granola and press down. Cover & refrigerate for 1 hour.
 |
| This is what they look like when you pull them out of the fridge. Had to cut myself one - OBVIOUSLY!! |
 |
| Granola bar - top angle |
 |
| Granola bar - side angle |
 |
| Sorry they looked kind of clumped on here but I promise they are really good! |
I originally was going to store the bars on my cake plate on my counter but they started to soften up a bit & kind of get a little crumbly so I put them back in the fridge in a plastic container.
Some pics of my organization skills...
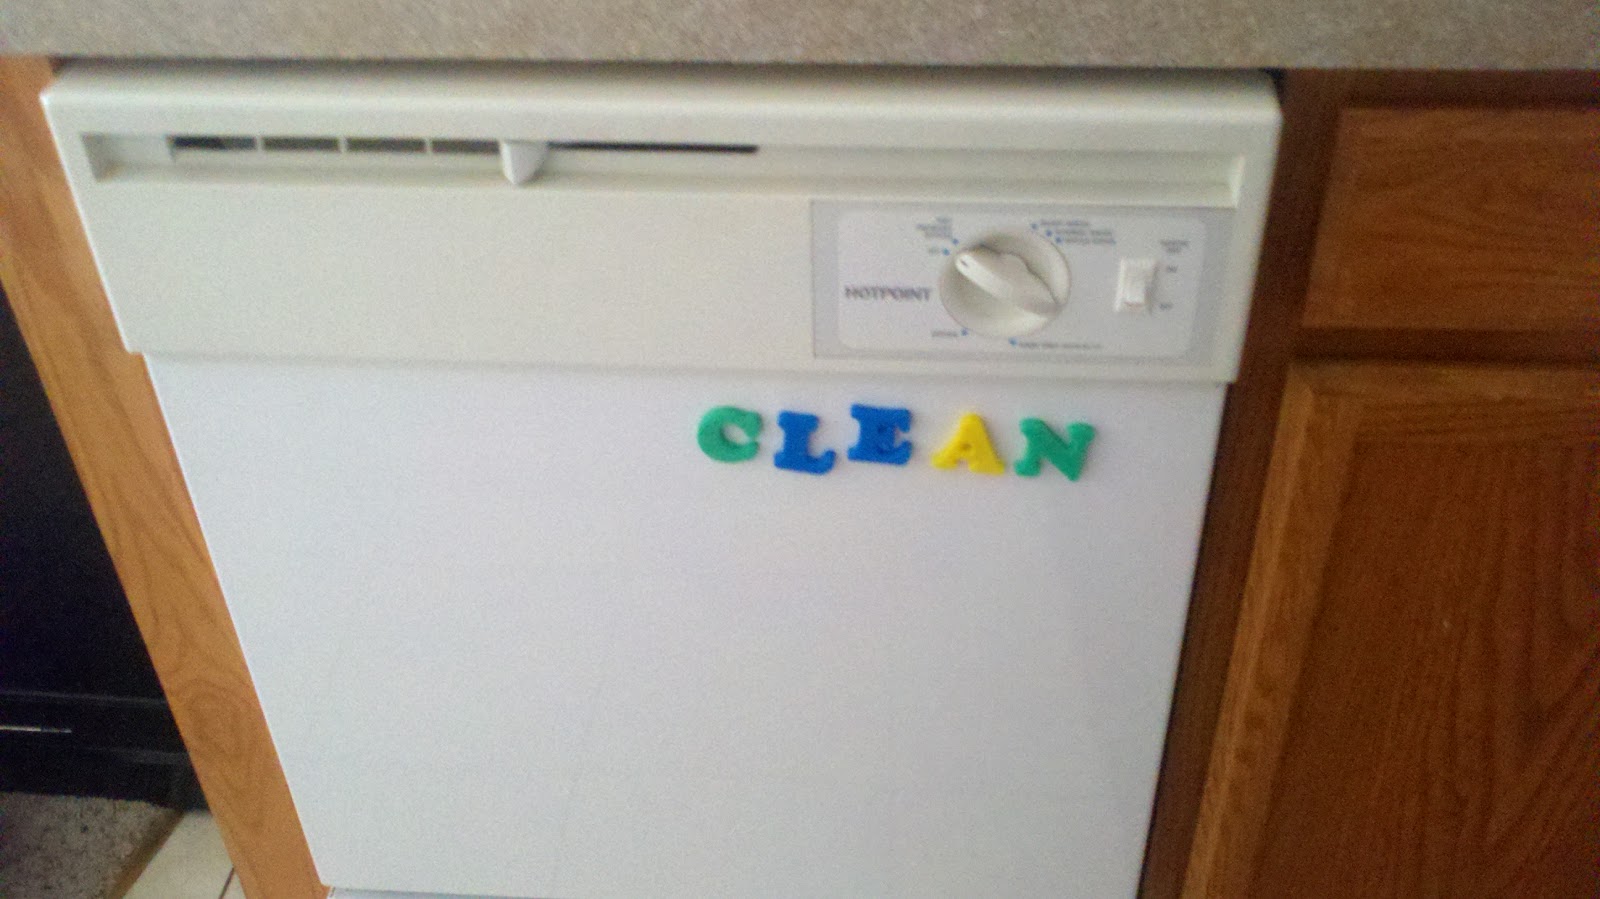 |
| Dishwasher - CLEAN (using magnetic letters) |
Not sure if everyone has these magnetic letters or not but my daughter plays with them on my refrigerator and I came up with the idea to write "clean" and "dirty" on the dishwasher with them because my husband is always asking, "are these clean or dirty?" so now I don't have to answer him because of course he will still ask :-)
 |
| Dishwasher - DIRTY (using magnetic letters) |
FYI: I only have one set (got them from the dollar bin at Target during back to school) and one set will spell CLEAN and DIRTY. How awesome is that??
 |
| Baking Products |
I LOVE THESE OXO Pop Top Containers - actually I am rather obsessed with them. Not sure it is a good obsession because THEY ARE EXPENSIVE. I do try and get them at various places - when I get a Target gift card I buy one, or when Kohl's has Kohl's Cash, I use it for these. Amazon.com has great prices too as well as Zappos.com.
I used the 4 quart size for flour, sugar, and powdered sugar. The bigger the better for these bulkier items. I also store plastic (cheap) measuring cups inside as well. I have nice stainless ones but these plastic ones were maybe a dollar or two for an entire set at Target (check the dollar store too).
I used the 1.5 quart size for light & dark brown sugar - probably could have gone bigger but these fit the one pound boxes and possibly more.
Then I used the .5 quart size for mini chocolate chips and regular semi-sweet chocolate chips.
I just got a bunch more of these containers for my pantry so I will show some pics later. I am still not 100% in love with the pantry but getting there. I want to get a few of the 2.4 quart size for snacks and some more of the 3.7 quart size for cereal.
Here are pics of what I did to my cabinet under my sink.


The over the door wire basket holds plenty or bags and wraps (foil, press n' seal etc).

Large lazy susan had to be strategically placed b/c things kept smacking into the garbage disposal and its cord but I moved it around as best as I could and put the taller items toward the middle.
I also keep a bucket under there that I throw dirty cleaning rags in until I wash them. I don't like keeping those stored with regular laundry.
Another cool tip - use an old tissue box to store plastic grocery bags - I put a metal tissue box cover over mine to make it look better (I had it and wasn't using it). I also used an old wipes container to put a sponge and a few misc. small items into it.
I have lots of other missions all around the house...more to come!
Wednesday, February 8, 2012
Haven't forgotten about the blog...
I haven't forgotten about writing. I have actually been trying to accomplish Mission: Organization as my "try something new" and it has been a couple week long process AND I AM STILL NOT DONE!!
Sure, we all try to organize so I know this is kind of old hat but I really stink at it. I love being organized and I can't manage to get it right. My something NEW is really trying hard to organize right the first time and to stick with it.
I always buy baskets, bins, etc. and then stare at them. I am really taking my time making sure I get it right the first time by measuring and picking the right "organization tools."
So why such an interest in organizing...
We are living in a small apartment and a little mess can look like a huge mess and at some point we are going to move again. I hate packing and moving and I want to be organized so that the next time I am better prepared. I also have toys everywhere from my daughter and I am running out of room for them all. My husband doesn't help - he is pack rat and has papers everywhere. I want to cut down on the paper mess and stay on it. This isn't easy for me either - I am a "piler." I stack papers in little piles and plan to "get to them later." I am still doing it as we speak and I seriously need to stop. It drives me crazy.
So here is what I have done...
As for the paper mess, I am still in the process of coming up with an ideal system but got a great idea from Better Homes & Gardens magazine (www.bhg.com) - January 2012 issue. I tried looking for the article online but couldn't find it. The article is titled In-Box RX and it gives ideas for organizing papers.
Basically I bought a file system that I hung on the wall by our desk. There are three folders - one that says Do Now, Do Later, and Pending. I also bought a separate bin as an Inbox. So far that is about as good as it gets. I am actually using the Inbox right now for the shredder pile. That is my husbands job and as you can tell, it is not getting done. He has papers everywhere and I don't know what we need and what we don't at this point. I can organize from here on out but the current mess is all him - I cleaned up most of mine.
My best accomplishment is the cabinet under my sink. It is a corner cabinet and kind of awkward but I bought a large lazy susan from Bed, Bath & Beyond and put all the cleaning items and what not on it. It is awesome!! I also bought a basket that hangs over the cabinet door and it holds plastic bags, aluminum foil, and garbage bags.
I also have done a lot of reorganizing of our pantry. I bought cheap plastic bins at target that are made to store shoes and I put those on the shelves for snacks and opened bags of "whatever."
I have done a bunch of other little odd and ends too. I need to organize my thoughts (SERIOUSLY) and will post more ideas on here.
I am also working on the closets and want to tackle the garage.
I would like to post pictures but I am not queen organizer so if my ideas aren't as pretty as what others see out there, please don't hate :-) It is working for us (so far and sort of) and I guess that is all that matters.
Sunday, February 5, 2012
Mrs. Field's Chocolate Chip Cookie Recipe
 Haven't been on in about a week (will write more later) but wanted to share an oldie but a goodie - one of my favorite chocolate chip cookie recipes. My family had the Mrs. Field's Cookbook (back in the day) and I have always liked the chocolate chip cookie recipe. I love Mrs. Field's cookies and who doesn't love chocolate chip cookies!
Verdict: The key to this recipe is to bake low & slow but I do think the next time I will bake a few mins less. These came out a little crunchier that I would have liked but still good!! I am used to baking in a convection oven and now our apartment has a regular oven so bake times vary depending on the oven.
Preheat oven to 300 degrees
Yield 3 1/2 doz
Bake 22-24 mins
Ingredients:
2 1/2 cups all-purpose flour
1/2 tsp. baking soda
1/4 tsp. salt
1 cup dark brown sugar
1/2 cup white sugar
1 cup (two sticks) salted butter (softened)
2 large eggs
2 tsp. pure vanilla extract
2 cups semisweet chocolate chips (12 oz. package)
In a medium bowl, combine flour, baking soda, and salt
In a large bowl, blend both sugars, softened butter, eggs, and vanilla (don't over mix)
Add flour mixture a little at a time to the sugar/egg/butter bowl but do not over mix. Stir in chocolate chips.
Drop rounded tablespoons of dough onto cookie sheet.
Bake 22-24 mins. (next time, I may try only 20 mins or so and see. The cookies continue to bake when you let them set on the baking sheet and cool.)
Enjoy!!!
UPDATE: I have started refrigerating the dough (few hours to overnight) and even freezing some of it before I bake it. I am also baking at 350 for 8-10 minutes. The cookies come out A LOT softer/chewier which is what we like better.
Tuesday, January 31, 2012
eBates
I love eBates. Just wanted to post my link so everyone can sign up.
http://www.ebates.com/rf.do?referrerid=PqgMaY6VMxDFQsggsnAIeg%3D%3D
Just this past quarter, I earned $69.63 for shopping online. I am waiting to get my money in the next week or so.
It is so easy. You just go to eBates.com every time you want to shop online and click to the site you want to go to through the eBates site. It keeps track of where you shop and you get cash back every quarter. I have elected for the cash to go into my Paypal account to so I get it quicker than getting a check in the mail. Not every store is available but there are a lot so always check!!
FYI: I think you can also earn a gift card if you sign up & make a qualifying purchase (I think you have to spend at least $25 at one of the participating retailers). I received a $10 Target gift card when I signed up.
Monday (better late than never)
I did not really do much of anything new on Monday, oh well! I am in the process of trying to organize my "home" (aka apartment) so that when it comes time to move AGAIN (at some point) I will be ready.
Organizing is not NEW for me but I seriously suck at it. Yes, I said SUCK!! I buy baskets, bins, crates, etc. and just stare at them. I have shelves, plastic storage, OXO pop top containers and I never no how to use them to the best of their ability. I do have a very logical mind and I can pack and stuff more crap in a place with the best of them but when it comes to making it look pretty that is another story!!
I would love to learn how to organize and make my life so much easier. I look at all these pretty blogs online and see these EXTREMELY organized houses - sorry, have to write this, but WTF!!! Those pictures cannot be real- like seriously-labels, a place for everything AHHHH??? I am so jealous!!! I really try but as soon as the hubby walks in the door, the tornado of a mess starts. I can't even leave my daughter alone with him because my house looks like Baghdad. I follow her around all day so I clean up ALL DAY!!
I am really on a mission to organize and do it right. SOOOOO I guess I can so that my something NEW would be trying to get it right.
Let's see how this goes, um yeah....
Sunday, January 29, 2012
Sunday's something new
Nothing major today...watched a "new" movie with my daughter today. It's a lazy Sunday for us so this is as good as it gets.
We watched Mr. Popper's Penguins. Loved it!! Sometimes I like Jim Carrey and sometimes not, but this was a cute movie. I love penguins and so does my 20 month old!! My attention span lasted a lot longer than hers but she did seem to enjoy the movie which has a lot of action.
Best part - Carrey was wearing a Pittsburgh Penguins jersey at one point in the movie :-)
Also...Forgot to add...I tried a new pasta product today. Barilla Piccolini Mini Rotelle Wheels (Zucchini & Spinach Flavor)...actually really good. I made homemade mac & cheese with them and so far its a hit. Supposedly there is a serving of veggies per 100g portion so I feel a little bit better ;-) The ingredients do show spinach & zucchini puree listed so who knows. These are green and do have a spinach flavor to them but in the cheese sauce you really can't tell. So far, so good!
Simple Tip - Easy Way to Clean Your Coffee Carafe

Here is a simple way to clean out your coffee carafe - without having to wait on the dishwasher.
I "deep" clean my carafe out weekly and this is what I do - This helps get rid of the stubborn coffee stains.
I soak my carafe in 1 - 2 tbsp of OxyClean and 1 tsp (or a few foaming pumps - see my earlier post on how to stretch a buck) of dish soap. I allow it to soak for 10-15 minutes and then I rinse. It comes sparkling clean.
If you do not have OxyClean around, you can use 1/4 cup baking soda instead. I haven't tried this yet but might next time to see how it works. Baking soda is so much cheaper (possibly safer/more eco friendly) but I do love OxyClean.
I wonder if you use some vinegar and baking soda how it would clean (instead of the soap & soda)? Remember making lava for science projects in school - I love the foaming action. I mix OxyClean & bleach sometimes when I launder whites just because it foams up like crazy. Love it!! :-)
Saturday's Something New...Made a Chocolate Pantry Cake
I tried a new recipe for chocolate cake yesterday (Saturday) - this is a busy day chocolate cake or a pantry cake. You make this with things you already have on hand in your pantry - you don't even use eggs!! The recipe is from Lucinda Scala Quinn's show Mad Hungry (on the Hallmark Channel).

This was really good. The frosting recipe is the simple buttercream frosting from Martha Stewart. I cut the recipe in half for the cake. If you double the cake recipe, you can keep the full icing recipe as is. The cake makes only an 8 x 8 size (I used a 9 x 7 pan because that is all I have) so if you double you could probably use a 13 x 9 pan and the full icing recipe.
http://www.marthastewart.com/334278/busy-day-chocolate-cake
My only variation was that I used a little bit more vanilla extract. Vanilla extract enhances the flavor of chocolate so I thought I would use just a touch more. As I wrote above, I also cut the icing recipe in half because you do not need almost three cups of icing for such a small cake. FYI - the icing recipe calls for unsalted butter and then you add salt. I used salted butter and did not add anymore salt. Up to you, but I never buy unsalted butter just because I do not like it. Even though the claim is to always bake with unsalted, I never do.
Verdict: This was my piece. Yum!! I refrigerated the cake for fear that the icing would melt/separate. I recommend pulling the cake out ahead of time to allow the icing to soften back up before serving but it stores fine in the fridge.


This was really good. The frosting recipe is the simple buttercream frosting from Martha Stewart. I cut the recipe in half for the cake. If you double the cake recipe, you can keep the full icing recipe as is. The cake makes only an 8 x 8 size (I used a 9 x 7 pan because that is all I have) so if you double you could probably use a 13 x 9 pan and the full icing recipe.
http://www.marthastewart.com/334278/busy-day-chocolate-cake
Ingredients
- 1 1/2 cups all-purpose flour, (spooned and leveled)
- 1 cup sugar
- 3 tablespoons unsweetened cocoa powder
- 1 teaspoon baking soda
- 1/2 teaspoon coarse salt
- 6 tablespoons vegetable oil
- 1 teaspoon pure vanilla extract
- 1 tablespoon white vinegar
- 1 cup cold water
Directions
- Preheat oven to 350 degrees. In an 8-inch square baking pan, whisk together all-purpose flour, sugar, unsweetened cocoa powder, baking soda, and coarse salt.
- Make a well in center of flour mixture and add vegetable oil, pure vanilla extract, white vinegar, and cold water. Whisk until well combined. Bake until a toothpick inserted in center comes out clean, 35 to 40 minutes. Let cool completely in pan on a wire rack.
Variations
To make this recipe as prepared on "Mad Hungry" TV, top your chocolate cake with this Simple Buttercream frosting.
My only variation was that I used a little bit more vanilla extract. Vanilla extract enhances the flavor of chocolate so I thought I would use just a touch more. As I wrote above, I also cut the icing recipe in half because you do not need almost three cups of icing for such a small cake. FYI - the icing recipe calls for unsalted butter and then you add salt. I used salted butter and did not add anymore salt. Up to you, but I never buy unsalted butter just because I do not like it. Even though the claim is to always bake with unsalted, I never do.
Verdict: This was my piece. Yum!! I refrigerated the cake for fear that the icing would melt/separate. I recommend pulling the cake out ahead of time to allow the icing to soften back up before serving but it stores fine in the fridge.

barilla whole grain coupon
Barilla has a coupon for $1 off two boxes of Barilla Whole Grain Pasta on their Facebook site.
Just thought I would share - we eat a lot of this. In fact, I had to get a rain check at our local grocery store because it was on sale 10 for $10 and they had none left!!
https://www.facebook.com/BarillaUS
Just thought I would share - we eat a lot of this. In fact, I had to get a rain check at our local grocery store because it was on sale 10 for $10 and they had none left!!
https://www.facebook.com/BarillaUS
Found this interesting...15 Scariest Food Additives
Read this article on Men's Health Online about the 15 Scariest Food Additives:
http://eatthis.menshealth.com/slideshow/15-scariest-food-additives?cm_mmc=mh.com-_-editorial_contextual-_-newsletter_module-_-eat_this_not_that_2012&keycode=179239?cm_mmc=ETNTNL-_-780112-_-01292012-_-hed
I take some of it with a grain of salt but I also like to know what is in the food I am eating. I am fascinated by this stuff!! Take it for what it is worth but I thought I would share - as a mom, I especially want to know what is in the food I am giving my daughter.
Here is the list but read the article for further information.
1. Olestra
2. Caramel Coloring (I always wondered what this was)
3. Saccharin
4. Potassium Bromate
5. Butylated Hydroxyanisole (BHA) & Butylated Hydroxytoluene (BHT)
6. Partially Hydrogenated Vegetable Oil (trans fats)
7. Sulfites (I've seen this in dried fruit)
8. Azodicarbonamide
9. Carrageenan
10. Ammonium Sulfate
11. Aspartame
12. Monosodium Glutamate (MSG)
13. Nitrates & Nitrites
14. Blue #2
15. Paraben (yuck - I try to avoid this is beauty products, why would we want to eat this?)
David Zinczenko who writes the Eat This, Not That books is the Editor in Chief of Men's Health Magazine and always has really good information. I like to hear the science behind things and am fascinated by food chemistry - yes I am a big dork. I think I get this obsession of reading labels from my dad - no he didn't read food labels - but he died from colon cancer. He liked his junk food but he was also very smart about food science/chemistry, especially in baking, so I think I am learning from his situation.
Believe me, I am not perfect. I own Stove Top Stuffing and I have pepperoni that is preserved with BHA & BHT. I also have baking products with trans fats - Bisquick is one of them. I also have canned soups with MSG. Pepsi with caramel coloring is also in my fridge. I am not going to throw the food out but I think if we are more watchful of what we eat and don't eat it all of the time, then we are safer.
I guess the point that I take from this is to stick to whole foods (and organic when available and what I can afford)- fruits, vegetables, whole grains, etc. I try to do that as much as I can but sometimes these additives and foods are hard to avoid. We don't eat out much but sometimes quick meals are made with processed foods. I say be wary and read labels but I am not going to throw out food. I will watch what we eat but I hate waste. I am already and will be more cautious what I buy in the future.
Friday, January 27, 2012
Tried Making a Scarf
My something NEW today was trying to make a scarf out of an old t-shirt. I saw this technique on the Rachael Ray Show yesterday. The author of P.S. - I Made This, Erica Domesek, was on and showed how to make an old t-shirt turn into a scarf with only using scissors.

I want to make sure I personally don't take credit for the idea - the Rachael Ray Show website has the clip from the show where the author made this but I will give the basic idea of what I did. Here is the link from RR show site: http://www.rachaelrayshow.com/show/segments/view/ps-i-made/
I laid the t-shirt down flat and cut straight across right below the armpits.
Start cutting strips along the bottom edge about 1/2 inch wide and approx. 6 inches long. Cut the entire length of the t-shirt. Do this on both sides.
Basically you will have a rectangle, with a strip in the middle that looks like a "scarf" and the edges are cut/fringed. Once you have the strips cut, tug on them a bit to make them kind of roll up and look more like fringe.
If you watch the clip, it is so much easier to understand and see what I am talking about. Mine did not come out as pretty as I had liked so I didn't take step by step pictures. I will probably try this again and see if I can make it look better.
My verdict: This is an awesome idea and the scarf is really cute BUT I highly recommend using really sharp scissors that have only been used for sewing and cutting fabric. My scissors are really crappy so the strips came out very messy. When you tug on the strips, it hides the messiness a bit but I am kind of a perfectionist so I want to try this again with better scissors. I think I was so excited to see the outcome that I rushed.
I love recycling/repurposing things and this is a great way to do so. Glad I watched the RR show yesterday - nice break from Nick Jr and Disney.
Stretch a Buck on Dish Soap

My picture here is not exactly pretty but I wanted to share how I stretch a buck on dish soap (such as Dawn, Palmolive, and MY FAVORITE Mrs. Meyer's Clean Day). I also feel that dish soap is so SOAPY that you really don't need that much anyways so this extends the life of the soap.
I re-purpose those foaming hand soap containers - this one is either from Bath & Body Works or Softsoap (I can't remember). Just make sure it is the foaming soap container.
Mine bottle isn't pretty but you could always make a pretty label or make it look as nice as you want.
Basically I fill the container about a quarter of the way full with whatever dish soap you choose. I think I have Dawn Hand Renewal with Olay in mine (it is a pink color). I have also done this with Mrs. Meyer's dish soap as well. Because I am using the Dawn Hand Renewal, it may also work as hand soap - double duty.
Once I fill with dish soap, I add warm water. Not too full because the cap takes up some room when you place it back in - I would say fill about 3/4 of the way full with water.
Put the cap back on and shake a bit to dilute the soap.
You now have foaming dish soap. Very easy, cheap, and helps save a few bucks.
I've seen containers from kitchen supply companies that do the same thing but I like the idea of re-purposing what I already have. You could also do this with hand soap as well. I would probably try to make the bottle prettier. This could probably work with any kind of soap - even shower gel & shampoo. I haven't tried that yet but might give it a try. I think most of us probably waste more soap than we think. We don't really need as much as we pour out. Good luck and I would love to hear how you make your bottles pretty.
Thursday, January 26, 2012
Easy Pepperoni Bread
just decided to post this "recipe" for the heck of it...we make this all the time...SO easy and yummy!
Here in the 'Burgh we love our pepperoni bread
Preheat oven to 350 degrees
You need:
1 tube of Pillsbury Pizza Crust or Italian Bread (in the refrigerated section of the grocery store)
2-3 oz of sliced pepperoni (approx 1/4 to 1/3 of a package of pre-sliced pepperoni such as Hormel)
4 oz (approx 1 cup, maybe less) of shredded mozzarella cheese & I also use a little bit of cheddar or you can use "pizza cheese" which is mozzarella & provolone...parmesan can also be sprinkled in as well.
Unroll the pizza crust and slightly roll out w/ a rolling pin to make it more uniform. Don't make it too thin but just enough to make it uniform (approx. the size of a legal envelope)
Top the dough w/ cheese and then a single layer of pepperoni.

Roll up long ways - you don't want to use too much cheese or pepperoni b/c it can "explode" a bit in the oven.
Pinch the seam to keep everything from coming out when you back it and tuck the ends of the roll under.
Place on a baking sheet and coat the top w/ a little bit of olive oil (or vegetable oil).

Bake for 30 minutes at 350 degrees until the top starts to brown.
Allow to cool slightly before slicing. This is best eaten warm or room temperature. You can also reheat slices in the microwave.
I usually double the recipe and bake two loaves at a time.
You can also make these up and freeze. Just allow to cool and do not slice. Wrap in aluminum foil and freeze. Thaw and reheat!!
Enjoy - nothing fancy but so easy and we all love this!

Trying more natural products
I've been working on trying different (NEW), more natural body & face products. I feel like I have much more sensitive skin since I had my daughter so I am looking for products that don't have harsh chemicals that irritate my skin. Right now, I am trying a bunch of different/NEW stuff and so far am liking pretty much everything I have tried/see.
Started using the new lotion from Good Fortune Soap. The scent I chose is Lavender and Lemon. It smells really good - very therapeutic and relaxing scent. I like the texture because it is not really greasy so it works nicely for a hand lotion too. I hate greasy hand lotion. I end up washing it off and this sinks into the skin really quickly.
Good Fortune's products are natural and made with out all the harsh ingredients: sulfates, phosphates, parabens, phthalates, artificial colors/ingredients, and no petroleum products.
I am also trying out some of the soaps as well. I like the scents and so far so good. Sometimes soaps can be drying on my skin and these work pretty well.
I first heard about this company through the spa that I used to go to (before we moved) and I purchased the Edible Brown Sugar Lip Scrub at the spa. It is sooo yummy and I highly recommend it. I saw that the company had a website on the package and of course was intrigued. Had to try more of the products.
I'm liking what I have tried so far and would like to keep trying more. Love suggestions for these types of products.
Tuesday, January 24, 2012
Tried a NEW Scent Today
We went out to breakfast this morning and went shopping afterwards - none of this is new for me - I love to shop!! Nothing much out of the ordinary but I happened to stumble upon a NEW scent that I really like.
The scent itself isn't NEW but for me, it is a NEW scent.
Of course I just had to go into Juicy to shop for my daughter - like HELLO who doesn't love a little Juicy Couture - and as I was checking out, I was sniffing their scents.
I am now in love with Viva La Juicy. I did not want to buy the big bottle of the perfume so I bought the rollerball version that is only $19. It smells so good - slightly sweet - and the rollerball is a more intense scent.
Okay so you are saying, why does this count as something NEW? Well I guess I am going to encompass anything that falls into the category of new - whether it be a product, recipe, or task.
All of this may not be very exciting but I do love to try NEW products and it is especially nice when I really like the new product - well worth the money spent.
Hopefully sharing the info helps someone else make a decision - because decision making is not always my strong suit (usually I know what I want but when I don't forget it).
I also bought myself my first pair of TOMS shoes today. I like the message behind the TOMS company - One for One. If you buy a pair, the company also donates a pair to someone less fortunate who needs shoes. I feel good about being able to get new shoes but also knowing that someone else will as well!! Kind of sad, but I guess this is kind of my good deed for the day.
Monday, January 23, 2012
Something NEW: Sharing a favorite recipe
I made one of my favorite go to meals tonight for dinner in the crockpot...pot roast with potatoes and carrots. Ok, so you are thinking, if this is a go to meal, then this is definitely not something NEW.
Well the NEW part for me would be to share the recipe. It is definitely nothing fancy AT ALL but it is SO GOOD and I make it all the time. My mom is the one that showed me how to make this (she used to make it on the stove in a dutch oven but I adapted it for the crockpot and now she does the same) and I don't know where the "recipe" even came from but I am willing to share. Not sure why it is a big deal to give this recipe because even as I write this I share recipes all the time and I don't even think about it. Maybe I am starting to learn something already about myself - writing my thoughts down can make the task seem a lot easier.
Crockpot Pot Roast:
Sirloin Tip Roast or English Chuck Roast (both are really tender) - I like the meat to start to fall apart once it is cooked - I don't slice the meat
Baby carrots (I usually use around half a bag of the 1 pound baby carrots)
2-3 medium russet potatoes, peeled and cut into large cubes or quartered
Seasoning:
Salt, pepper, garlic powder, and dried basil
I spray the crockpot w/ cooking spray - makes for a MUCH easier cleanup.
Place the meat into the crockpot and add a little bit of water (maybe 1/4 cup).
Season the meat w/ the seasonings above in the order listed. I usually like to make a nice coating of the basil.
I don't measure, I'm sorry. What I usually do is take a few pinches of salt and sprinkle on the top and same with pepper. I use more salt than pepper but nothing too crazy. Maybe to guess I would say 1/2 tsp salt and 1/8 tsp pepper. I would do less first and then add more if you think it needs it.
I sprinkle the garlic powder overtop - maybe like 1/8 tsp or 1/4 tsp - not too much.
The basil I use is dried and I probably use about 2 tsp to 1 tablespoon. I take it in the palm of my hand and kind of crush it a bit to release more of the flavor and coat the top of the meat.
Cover & turn the crockpot on low for 6-8 hours.
I usually add the carrots and potatoes about half way through so they do not get mushy. For example, if I start the roast at 8 am, I put the carrots and potatoes in around noon or one and we usually can eat around 5. I usually scatter them around the roast and whatever doesn't fit, I put on top of the roast. I usually add some more seasoning so that the potatoes are flavored but that is up to you. They soak up the flavor of the meat so they taste great either way.
If you are away all day and aren't able to add the potatoes and carrots, I usually opt for making mashed potatoes. You might be able to put everything in all at once but I fear that vegetables would get mushy being cooked that long.
Best part about this meal is that it is a one pot meal. I usually serve with a salad and rolls or crusty bread.
I like the meat to be fall apart tender - I don't shred it (like pulled pork or anything) but I don't like it sliced. It usually just falls apart on its own. The potatoes are nice and tender as well as the carrots. The flavor of everything together with the spices is the best part. You can also use the juices at the bottom of the crockpot as an au jus and pour it over the meat and vegetables - so good!
This meal is also AWESOME left over.
I am using the leftovers to make hot roast beef sandwiches with french fries and gravy.
The great part is - I got the roasts buy one get one free (froze them) and I usually have everything else on hand for both meals. I buy frozen french fries and bake them and I use either packet or jar gravy.
Well I shared and now I feel better...well sort of...still have to find more NEW things to think of doing/trying....lots more!!!

Sunday, January 22, 2012
New Recipe
So I made a NEW recipe tonight...this might count as my "new thing" for tomorrow because I am the only one who has tried it so far...but we'll see!!
I made a cinnamon roll cake - found the recipe on Pinterest from this blog: http://cookinupnorth.blogspot.com/2011/07/cinnamon-roll-cake.html
My Verdict:
I was going to post a picture but I don't know if the cake came out as pretty as I had planned. It tasted pretty good but I think the amount of cinnamon topping could probably have been cut in half - It uses two sticks of butter. I am going to reheat a piece in the morning and see how I like it.
This did taste like a cinnamon roll - but more like a cinnamon roll/coffee cake - I guess that is why it is a cinnamon roll cake.
The reviews said AMAZING and BEST CAKE EVER - I am not sure I am sold on it being THE BEST CAKE EVER but going to try another piece - my first piece was still a little hot right out of the oven AND it was a corner piece (which I hate) but it was the first piece.
I love trying new recipes but as I said before, I hate when I make (or do) something and feel like I failed, so this blog is going to be my attempt to get out of that rut. I don't think I failed at this recipe BUT would have liked the results to be the kind of cake that I can't keep my fork out of - come on, you know what I am talking about.
I will update in the morning, once I've had my next piece (and of course, my coffee). I am going to see what my husband and baby girl think as well. My 19 months old gives me a very honest MMMMMM when she likes something - my husband says everything is good (such a nice guy).
Sidenote: This is also my first recipe to make from Pinterest. I recently became a Pinterest fanatic so I guess pinning is also something NEW that I am trying.
Well....reheated the cake in the morning and it was good - I made sure I had a gooey middle piece, which is my favorite part of a cinnamon roll. I still think I might try to make an easy cinnamon roll recipe and see what I like better. My husband liked the cake though. I guess I am just too hard on myself and can be very critical, especially when I am trying something NEW! Basically the reason that I wanted to start this blog again, so I can force myself to try something new and learn and move on.
I'm back...
So another year later and I am deciding to start up my blog again...
I think I am going to head in the direction of making this blog about trying something new everyday.
Don't worry...I'm not adventurous so I'm not going to be bungee jumping or anything like that. It took me an entire year to start back up writing on here again - that is a task in itself. I would like to force myself to try something new everyday - some tasks may be "larger" than others - and to some people, these tasks me be no big deal but to someone who is a very routine, boring person - trying something new, no matter what it is, is a big deal!! I have a fear of failure and the unknown so if I don't know the outcome, I avoid doing it (whatever IT may be). I am trying to force myself to change a little.
Today's something NEW - is getting back on this blog and writing. Ok, so it is not NEW, NEW but forcing myself to write is a big deal for me. I am going to try a bunch of new things - recipes, tasks, ideas, etc. I might bore some (maybe all) people but hey, I am going to try and not care (also something new for me).
Now to start thinking up about 365 other missions...YIKES!!!
Subscribe to:
Comments (Atom)